Build workflows
A workflow is the set of steps Cadrix follows to do a job. This page covers the canvas, the building blocks, and how to switch a workflow on.
On this page
Two kinds of workflow#
When you create a workflow, Cadrix asks which kind you want.
- Agentic workflow
- Multi-step automations with triggers, agents, tools, branches and human approvals. This is the kind most pages in these docs describe.
- Conversational workflow
- A chat experience over your knowledge and tools, ready to embed on a website.
Both are listed under Build → Workflows, with their health and status. You can also start from Templates (Community Templates from Cadrix, or My Templates from your own organisation) and choose Use template.
The canvas#
An agentic workflow is drawn on a canvas. Each box is a step (the app calls them nodes). You drag steps onto the canvas and connect them with lines. The run follows the lines from left to right.
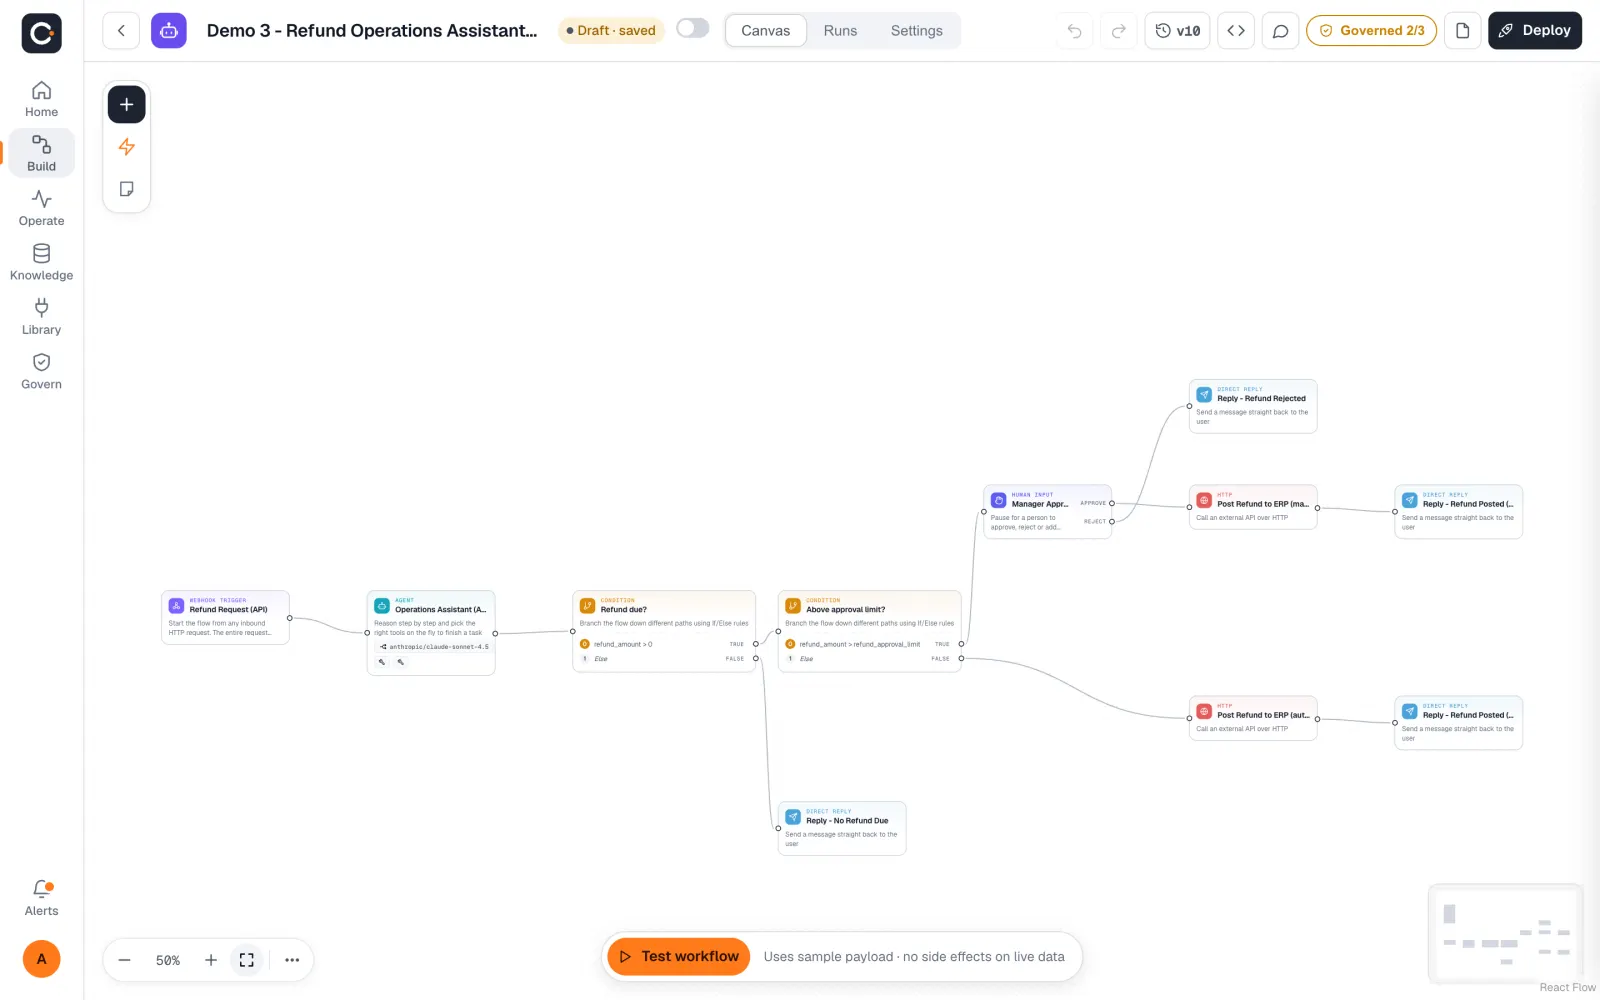
The top bar of the canvas has the workflow name, the tabs Canvas, Runs and Settings, and buttons for undo, redo, Version History, the API Endpoint, Test workflow and save. The status next to the name tells you where the workflow stands: Draft · not saved, Draft · unsaved changes, Draft · saved or Active.
In any text field on a step, type {{ to pick a value from an earlier step or from a variable.
Start a workflow#
Every agentic workflow begins with a Start step, or with a trigger.
The Start step#
Input Type chooses how a run begins:
- Chat Input starts from a message, either typed in the chat or sent over the API.
- Form Input shows a form first. You set a title, a description and the fields. Each field has a type (String, Number, Boolean or Options), a label and a variable name.
The Start step also has Ephemeral Memory (start fresh every time, with no past chat history), Flow State (values kept while the workflow runs) and Persist State (keep that state across the same session).
Triggers#
A trigger starts a workflow without anyone typing. Triggers only fire while the workflow is Active.
| Trigger | Starts the workflow when |
|---|---|
| Schedule Trigger | a recurring time arrives. Choose Interval (simple) or Cron Expression (advanced), and a Timezone. |
| Webhook Trigger | any inbound HTTP request arrives. The whole request is available to later steps. |
| Email Trigger (IMAP) | a new email arrives in a mailbox you connect over IMAP. |
| Microsoft Outlook 365 Trigger | a new email arrives in a Microsoft 365 mailbox. |
| WhatsApp Trigger | a WhatsApp event is received. |
| Error Trigger | a workflow fails. See Handle failures. |
Agents and models#
The Agent step reasons step by step and picks the right tools to finish a task. The simpler LLM step uses a model to interpret input and write a response, with no tool choice.
On an Agent step you set:
- Model
- The AI model and the connection (your provider key) it uses. Cadrix works with the provider you configure, using your own key.
- Messages
- Instructions for the agent, each with a role: System, Assistant, Developer or User.
- Tools
- What the agent may use. Each tool has a Require Human Input switch, so a person must approve before that tool runs. See Human approvals.
- Knowledge (Document Stores)
- One or more of your virtual databases, with a description so the agent knows when to look in it, and an option to return source documents.
- Enable Memory
- Lets the agent remember the conversation. Memory Type is All Messages, Window Size, Conversation Summary or Conversation Summary Buffer.
A short list of well-described tools helps an agent choose correctly. Attach what the job needs, not everything you have.
Tools and actions#
These steps do things in other systems or produce files.
- Tool gives the model tools to act on external systems. See Integrations and connections.
- HTTP calls an external API.
- Custom Function runs your own JavaScript.
- Retriever fetches relevant context from a vector store.
- Execute Flow calls and runs another flow from this one.
- Direct Reply sends a message straight back to the user.
- HTML to PDF, Generate Excel and Generate PowerPoint create a PDF, an Excel (.xlsx) file or a PowerPoint (.pptx) presentation.
- Google Drive Upload and Google Slides upload a file to Google Drive, or create a Google Slides presentation.
- Microsoft Outlook 365 runs one Outlook operation as a step. WhatsApp Send Message sends a WhatsApp message.
- Sticky Note leaves a note on the canvas for whoever opens it next.
Conditions#
A Condition step sends the run down different paths using rules.
Add a Condition step and open it.
Add a condition. Choose its Type: String, Number, Boolean or Object.
Fill in Value 1, an Operation and, where the operation needs it, Value 2. String operations include Contains, Equal, Starts With, Regex and Is Empty. Number operations include Smaller, Larger and Equal.
Connect each output to the step that should follow. Each condition has its own output, and there is a final Else output for everything that matched nothing.
When you would rather let a model decide, use Condition Agent. It lets an agent choose which branch the workflow takes.
Loops and iterations#
Iteration#
An Iteration block runs the steps inside it once for every item. Set Array Input to the list to go through, for example a list of invoices from an earlier step. Drop the steps that should repeat inside the block.
Loop#
A Loop step jumps back to an earlier step to repeat part of the workflow. You set:
- Loop Back To, the step to return to.
- Max Loop Count, so the loop cannot run for ever.
- Fallback Message, shown if the loop count is exceeded.
- Update Flow State, to change state values as it goes.
Variables#
A variable is a shared value any workflow can read, such as a company name, a limit or an address. Change it once and every workflow picks it up on its next run.
Go to Library → Variables and choose Add variable.
Give it a name, for example
refund_approval_limit, and a type. Static uses the value you type. Runtime reads the value from the server's environment instead; use it for values that should not be stored in a flow.In any text field on a step, type {{ or write
{{$vars.refund_approval_limit}}. In a Custom Function, read it as$vars.refund_approval_limit.
The edit dialog warns about this. Check which workflows use a variable before you change it.
A caller of the API can also supply variable values for a single run. See Override settings per request.
Test a workflow#
Save the workflow. Some actions, such as Retry from here, use the saved version, so save after every change.
Choose Test workflow. Send a message or fill in the form.
Watch the canvas. Steps show their status as they run. Open a step to see its input and output.
If a step fails, fix it, save, and use Retry from here on that step to run it again. See Retry and re-run a failed run.
Version History keeps earlier saved versions. From there you can compare changes and clone a version into a new workflow.
Deploy and share#
The Deploy panel opens from the governance-checks button in the top bar. Its Pre-flight list checks flow validation, whether every step that needs a connection has one, which trigger starts the workflow, and whether the workflow is saved.
Its Channels list shows how the workflow can be reached: the API endpoint, the chat share link (Public, or Private and requiring sign-in), the embed widget, any schedule and any webhook trigger.
Make a workflow Active#
Active means the workflow's triggers are live. Inactive means its triggers do not run.
Save the workflow first. The switch tells you to if you have not.
Turn on the Active switch in the top bar, or in the Workflows list, where each row has the same switch.
Cadrix confirms: Workflow is Active, its triggers are now live.
Switch it off to stop schedules, webhooks and mailbox triggers without deleting anything. Flows you no longer need can be archived from the list and restored later.
Handle failures#
The Error Trigger step runs when a flow fails. It receives the failed workflow's name, the step that failed, the error message and the execution ID, so you can send a message to your team or log the problem. It only fires while the workflow it lives in is Active.
You can place it in the workflow itself, or in a separate workflow that handles failures for others. Cadrix looks for a handler in this order, and the most specific one wins:
- An Error Workflow chosen in that workflow's own Settings.
- An Error Trigger on the failing workflow's own canvas.
- The workspace default, if neither of the above exists and the workflow has not opted out.
Admins set the workspace default under Govern → Workspace policies (Default error workflow). A workflow can opt out of the default in its Settings under Error Workflow. Failures are still recorded in Runs.
Copy, export and delete#
Open the workflow's Settings (the gear in the top bar) for Duplicate, Save as template, Load from file, Export (a JSON download), View messages, View leads and Delete workflow. Which of these you see depends on your role.
The delete button says it removes the workflow and its history. Export first if you may want it back.