API and embedding
Run a workflow from your own system, or put its chat on your website.
On this page
API keys#
An API key lets one of your own systems run workflows and read results. Give each system its own key with the narrowest permissions it needs, so you can revoke one without touching the others.
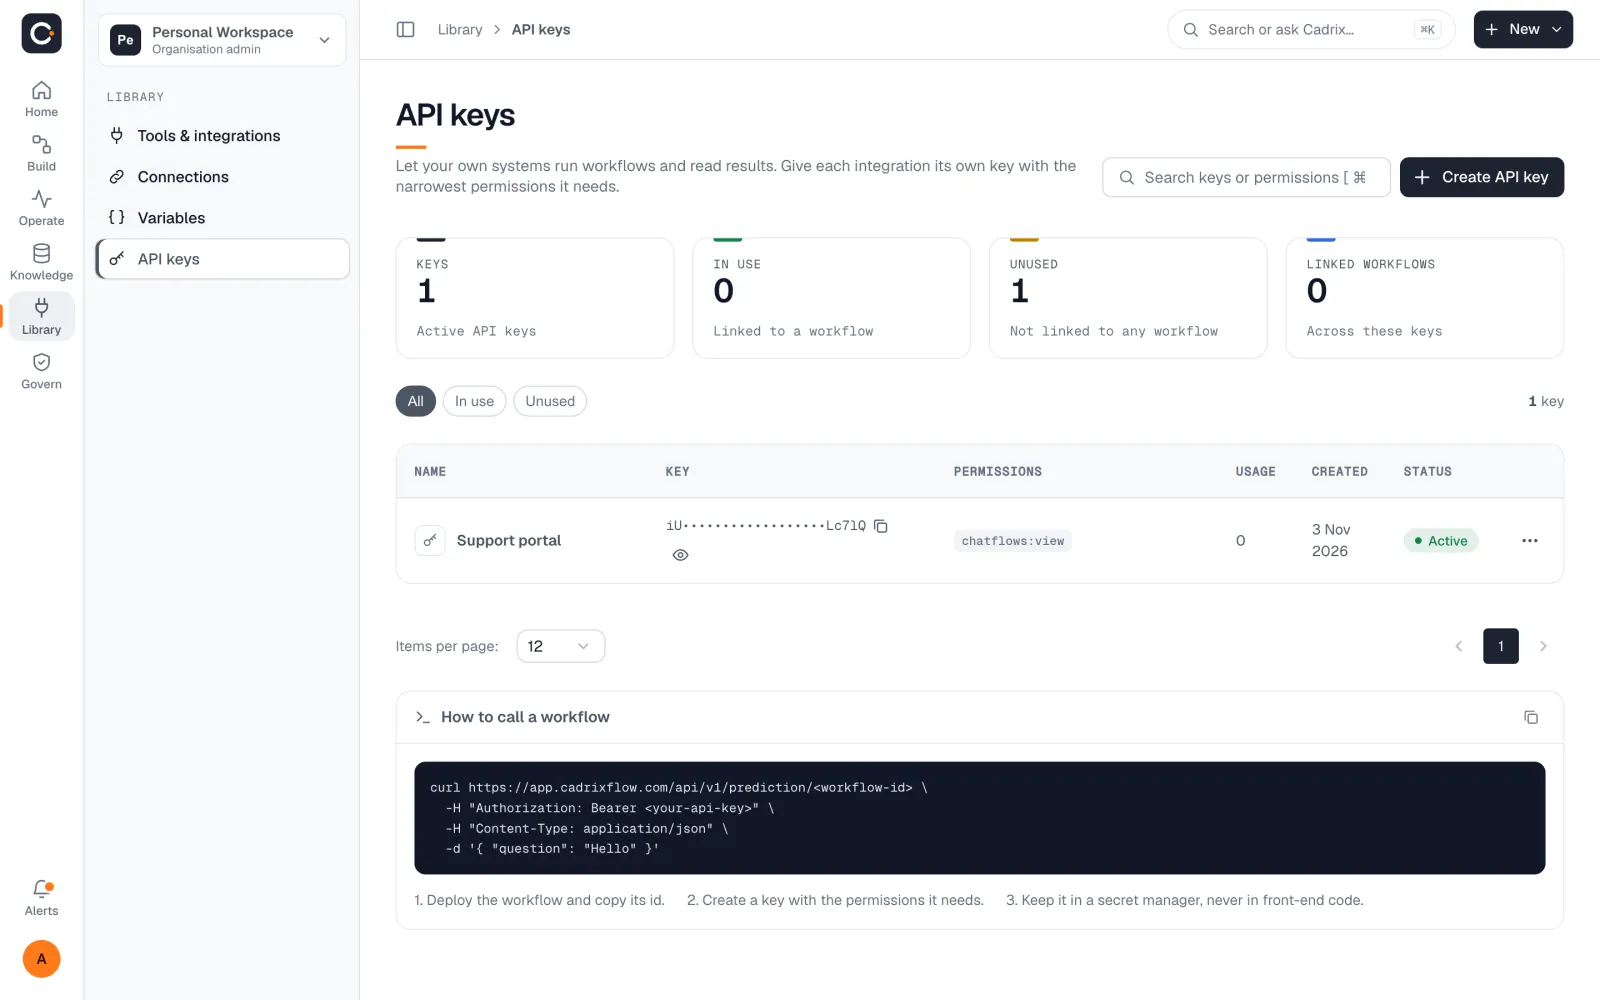
Create a key#
Open Library → API keys and choose to create a key.
Enter a Name after the system that will use it, for example Zapier bridge or BI export. It helps during an audit.
Pick the permissions the key needs. Viewing is added automatically when you grant anything else.
Choose Create key. Copy the key and store it somewhere safe.
The page counts your keys, how many are In use (linked to a workflow) and how many are Unused. Expand a key to see which workflows it is linked to.
Anyone holding the key can use what it allows. Do not put it in a web page or in code that runs in a browser. To use a key from a server, send it in the Authorization header, as below. If a key may have leaked, delete it and create a new one.
Require a key on a workflow#
Open the workflow's API Endpoint dialog and use the key selector (Choose an API key). Once a key is chosen, the code samples include it. A workflow that uses a key cannot also be embedded or shared as a public chat: the dialog tells you that you cannot use an API key while embedding or sharing the chatbot.
Call a workflow over the API#
Every saved workflow can be called over HTTP. The call runs the workflow once and returns its result. The workflow's id appears in its API endpoint: open API Endpoint in the canvas top bar, or the Deploy panel.
POST https://app.cadrixflow.com/api/v1/prediction/<workflow-id>
Authorization: Bearer <api-key>
Content-Type: application/json

{
  "question": "What were our Q3 numbers?"
}
The same call with cURL:
curl -X POST "https://app.cadrixflow.com/api/v1/prediction/<workflow-id>" \
  -H "Authorization: Bearer <api-key>" \
  -H "Content-Type: application/json" \
  -d '{"question": "What were our Q3 numbers?"}'
The API Endpoint dialog also gives ready-made Python and JavaScript versions with your workflow id filled in.
The response carries the answer and the identifiers you need to continue the conversation:
{
  "text": "...",
  "chatId": "e5c4...",
  "sessionId": "e5c4...",
  "chatMessageId": "9a11..."
}
Send the returned sessionId back on your next call to keep the exchange in one conversation.
Each call counts as a run in your monthly total. When a plan limit is reached the API answers with HTTP status 402 and a body that includes "code": "PLAN_LIMIT_REACHED". See When you reach a limit.
Override settings per request#
A workflow's settings are saved on the canvas, but a caller can override some of them for one request with overrideConfig. This lets one workflow serve callers that need slightly different behaviour without copying it.
{
  "question": "Summarise this",
  "overrideConfig": {
    "sessionId": "customer-4417",
    "temperature": 0.2,
    "vars": {
      "personality": "concise"
    }
  }
}- Step settings
- Any input a step exposes, such as model name, temperature or system message.
- vars
- Values for your variables for this run only.
- sessionId
- Which conversation the call belongs to.
Nothing can be overridden by default, so whoever holds an API key cannot swap a workflow's model, prompt or credentials. To allow it, open the workflow's Settings, choose Chat experience, open the Security tab, switch on Enable Override Configuration and enable only the properties a caller may change. A key that is not on the list is ignored, not applied.
Stream the answer#
Add "streaming": true to the request to receive the answer as it is written, as a stream of server-sent events instead of a single JSON body.
{
  "question": "Explain our refund policy",
  "streaming": true
}| Event | Meaning |
|---|---|
| start | The run has begun. |
| token | A piece of the answer. Append them in order. |
| agentFlowEvent, nextAgentFlow | Progress through the workflow's steps. |
| sourceDocuments | Passages retrieved from a knowledge base, when the workflow uses one. |
| usedTools | Tools the agent called. |
| error | The run failed. The message is in the payload. |
| end | The stream is complete. |
Some workflows cannot stream and return ordinary JSON even when you ask for a stream. Write your caller to handle both.
Embed the chat on your website#
A conversational workflow, or any workflow that starts from chat, can appear on your website as a chat bubble or a full-page chat.
Save the workflow, then open API Endpoint in the canvas top bar and choose the Embed tab.
Pick a format: Popup Html, Fullpage Html, Popup React or Fullpage React. Copy the snippet.
Paste it into your page. The popup version looks like this:
<script type="module">
  import Chatbot from "https://app.cadrixflow.com/embed/web.js"
  Chatbot.init({
    chatflowid: "<workflow-id>",
    apiHost: "https://app.cadrixflow.com",
  })
</script>
For a full page, the snippet adds a <cadrix-fullchatbot> element and calls Chatbot.initFull instead.
Limit where it works#
Open the workflow's Settings → Chat experience → Security. Under Allowed Domains, add the domains that may use the chat. It then only works from those domains. You can set the message shown on any other domain. The same tab has Enable Rate Limit, with Message Limit per Duration, Duration in Second and a Limit Message.
Share a chat link#
The Share Chatbot tab gives a link to a hosted chat page. Switch on Make Public to let anyone open it without signing in. You can set its title, welcome message, colours and avatars. Use Copy Link to share it.
Cadrix says it plainly: making a chatbot public allows anyone to access it without authentication. Keep sensitive workflows private, and use Allowed Domains and Rate Limit on anything public.
Other settings on the same dialog include Starter Prompts, Follow-up Prompts, Speech to Text, Text to Speech, Chat Feedback, Leads and File Upload.